In this AE you will build a personal website with Quarto, add one of your earlier AEs as a page, and publish it for free with GitHub Pages. You will finish with a live web address you can share.
Make sure your GitHub personal access token (PAT) works. Run the line below and look at the GitHub section of the output. It should show your GitHub user name.
usethis::git_sitrep()
If it says your token is missing or invalid, run usethis::create_github_token(), accept the defaults on the GitHub page, and copy the token. Then run gitcreds::gitcreds_set() and paste the token in when asked.
Part 1: Motivation (5 minutes)
Look through the Quarto website gallery. Pick one that you like and think about what you could use a site like that for.
WarningYour turn
Open a notes sheet somewhere you will find it again (a text file or a Google Doc is fine). Write down:
The link to the site you picked.
What you could use a site like that for.
You will add this to your own site in Part 2.
Part 2: Quick start
This follows the Quick Start section of the Quarto guide.
Create the project
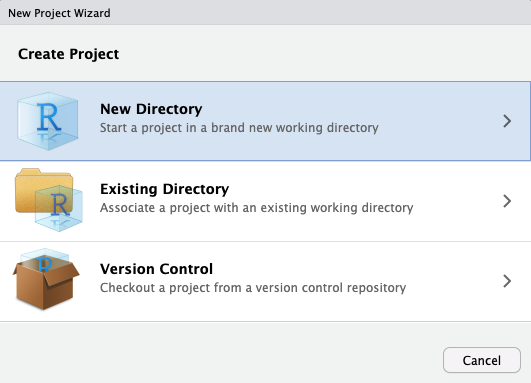
In RStudio, go to File > New Project and choose New Directory.
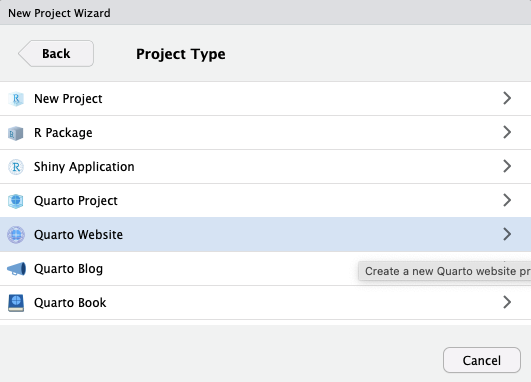
Then choose Quarto Website as the project type.
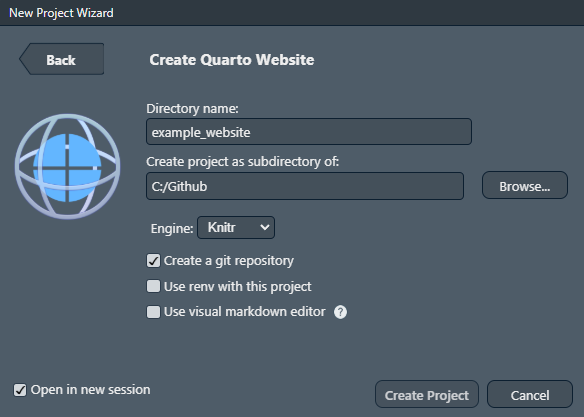
Finally, name the project and set the options.
WarningYour turn
Create your project.
Directory name: something short, lowercase and without spaces, like my-website. This name becomes part of your site’s web address.
Create project as subdirectory of: suggested to use your class github folder.
Leave Engine as it is.
Check Create a git repository.
Leave Use visual markdown editor unchecked.
Check Open in new session.
Click Create Project.
Preview
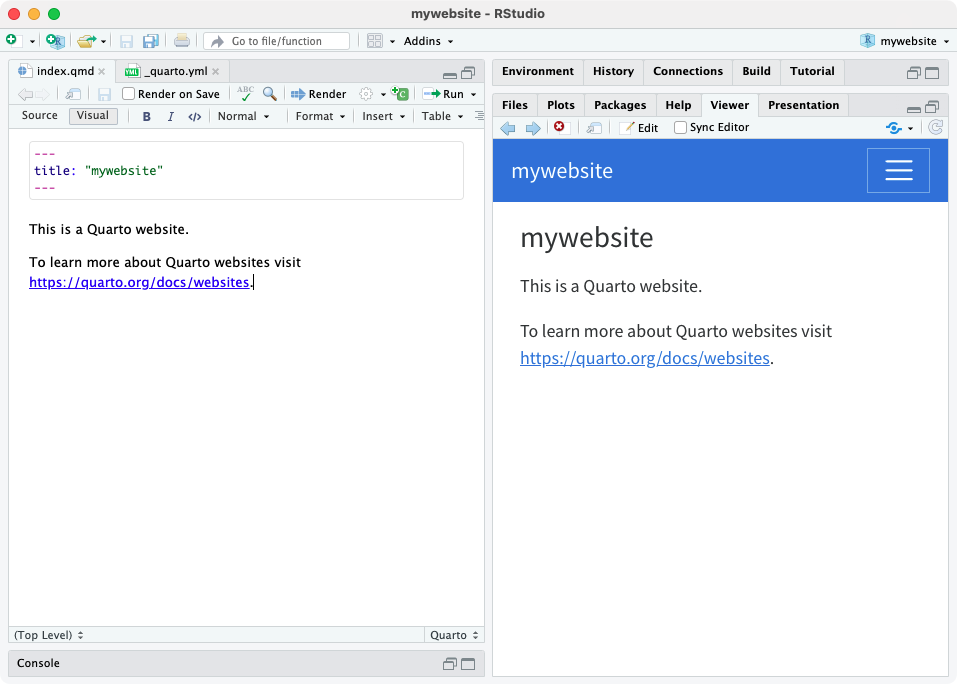
RStudio opens the project in a new session with index.qmd open. Click Render and the site shows up in the Viewer pane. Behind the scenes the Render button runs quarto preview. From now on the preview updates every time you save a file.
WarningYour turn
Click Render and look at your site in the Viewer pane.
Add content
WarningYour turn
Open index.qmd. Replace the placeholder text with what you wrote in your notes sheet in Part 1: the site you picked and what you could use a site like that for. Save the file and watch the preview update.
Open about.qmd. Replace the placeholder text with one sentence about yourself. Save the file.
Render the whole site
The preview only updates the pages you touch. To build every page, use the Build pane.
WarningYour turn
In the Build pane, click Render Website. Look at both pages in the Viewer pane.
Part 3: The _quarto.yml file
_quarto.yml controls the whole site. Here is the default file from the Quarto guide.
project: type: website tells Quarto this folder is a website, not a single document.
website: title is the name shown at the left of the navbar.
navbar is the menu across the top. Each item is a page (href) with a label (text). A bare file name like about.qmd is a shortcut.
format: html holds options that apply to every page. theme sets the look, css points to styles.css for your own tweaks, and toc adds a table of contents.
WarningYour turn
Open _quarto.yml. Change title: to something you like and save. The preview refreshes on its own.
WarningYour turn
(2 minutes) Browse the Quarto HTML themes. Change theme: cosmo to a theme you like, save, and look at the result. Try a couple.
Part 4: Pages with code
A Quarto website can hold any .qmd file, including ones with R code. Let’s add one of your earlier AEs.
WarningYour turn
Find your completed AE01 or AE03 .qmd file.
Copy it into the root folder of your website project, the same folder as index.qmd.
Open this new copy. Ensure the YAML has a format: html line.
Click Render on that file and make sure it works. If it fails, a package may be missing, so install it and try again.
Rendering the page is not enough. The site only links to pages you list in _quarto.yml. Add your page to the navbar using its file name:
In the navbar, move your AE page into a dropdown menu: labeled “Assignments”.
Add a docked sidebar: that lists Home, About and your AE page.
Save and click around. Keep whichever setup you like better, or keep both.
Part 6: Build again
You changed _quarto.yml, so do a full render to make sure every page picks up the changes.
WarningYour turn
In the Build pane, click Render Website. Click through every page in the Viewer pane and check that the navigation works. Fix any problems before moving on.
Part 7: Connect to GitHub
Your project is already a local git repo, because you checked the box in Part 2. Now put a copy on GitHub.
WarningYour turn
In the Git pane (or terminal), stage all the files and commit them with a message like “Initial website”.
In the Console, run:
usethis::use_github()
This function creates a repo on your own GitHub account with the same name as your project, makes it public, adds it as origin and pushes your commit. See use_github().
Go to GitHub and check that your files are there.
If you get an error about a token, go back to Part 0. If you get an error about uncommitted changes, commit everything in the Git pane and run use_github() again.
From now on you will commit and push from the Git pane. You only run use_github() once.
Part 8: Publish with GitHub Pages
GitHub Pages hosts a website straight from a GitHub repo, for free. You will tell Quarto to put the finished site in a folder called docs, then tell GitHub to serve that folder. See the Quarto notes on publishing and GitHub Pages.
WarningYour turn
Step 1: change the output folder. In _quarto.yml, add output-dir: docs under project:.
project:type: websiteoutput-dir: docs
Step 2: turn off Jekyll. In the Console, run:
file.create(".nojekyll")
This will stop Github pages from trying to re-build the site using a Jekyll engine.
Step 3: render into docs. In the Build pane, click Render Website. You should now see a docs folder in the Files pane. Select the old _site folder and delete it.
Step 4: commit and push. In the Git pane, stage everything (docs, _quarto.yml, .nojekyll, and any deleted _site files), commit with a message like “Publish site to docs”, and click Push.
Step 5: turn on GitHub Pages. On GitHub, open your repo and go to Settings > Pages.
Under Source, choose Deploy from a branch.
Set the branch to main and the folder to /docs.
Click Save.
Wait about a minute and refresh the page. A box at the top shows your live address, which looks like https://<username>.github.io/<repo>/. Open it.
Important
docs is output that you commit. After any change to your site, click Render Website first, then commit and push. If you skip the render, the live site will not update.
Part 9: Submit
Copy the web address of your live site (https://<username>.github.io/<repo>/), open it to make sure it works, and paste it into the AE06 assignment in Canvas.